Angular 8 服务和依赖注入
如前所述, Services 在 Angular 应用程序中提供特定功能。在给定的 Angular 应用程序中,可能有一个或多个服务可以使用。类似地,一个 Angular 组件可能依赖于一个或多个服务。
此外,Angular 服务可能依赖于其他服务才能正常工作。依赖关系解析是开发任何应用程序中复杂且耗时的活动之一。为了降低复杂性,Angular 提供了 依赖注入 模式作为核心概念之一。
让我们在本章中学习如何在 Angular 应用程序中使用依赖注入。
创建 Angular 服务
Angular 服务是普通的 Typescript 类,具有一个或多个方法(功能)以及 @可注入 装饰师。它使普通的 Typescript 类可以用作 Angular 应用程序中的服务。
import { Injectable } from '@angular/core'; @Injectable()
export class DebugService {
    constructor() { }
}
Here, @可注入 装饰器将一个普通的 Typescript 类转换为 Angular 服务。
注册 Angular 服务
To use 依赖注入 ,每个服务都需要注册到系统中。 Angular 提供了多种注册服务的选项。它们如下:
- ModuleInjector @ 根级别
- ModuleInjector @ 平台级别
- ElementInjector 使用提供者元数据
- ElementInjector 使用 viewProviders 元数据
- 空注入器
模块注入器@root
模块注射器 强制服务仅在特定模块内使用。 提供 元数据可在 @可注入 必须用于指定可以使用服务的模块。
该值应引用已注册的 Angular 模块之一(装饰有 @NgModule)。根 是一个特殊选项,它引用应用程序的根模块。示例代码如下:
import { Injectable } from '@angular/core'; @Injectable({
    providedIn: 'root',
})
export class DebugService {
    constructor() { }
}
ModuleInjector@平台
平台喷油器 比高一级 模块注入 并且仅在高级和罕见的情况下。每个 Angular 应用程序都从执行开始 PreformBrowserDynamic().bootstrap 方法(见 main.js ),它负责引导 Angular 应用程序的根模块。
PreformBrowserDynamic() 方法创建一个由配置的注入器 平台模块 .我们可以使用配置平台级服务 平台浏览器() 提供的方法 平台模块 .
空注入器
空注入器 比平台级别高一级 模块注射器 并且位于层次结构的顶层。我们无法在 空注入器 .当在层次结构中的任何地方都找不到所需的服务并简单地引发错误时,它会解决。
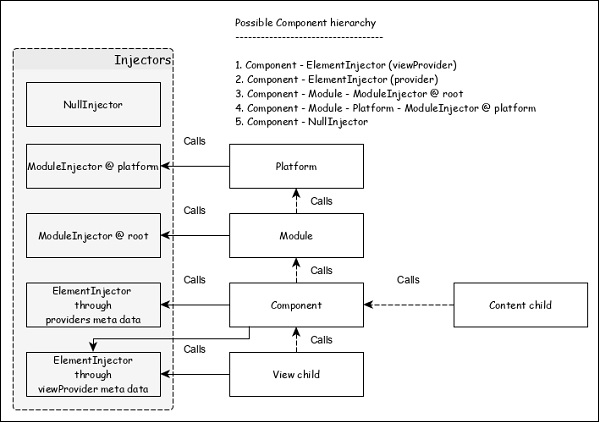
ElementInjector 使用提供者
元素注入器 强制服务仅在某些特定组件内使用。提供者和 视图提供者 元数据可在 @零件 装饰器用于指定对特定组件可见的服务列表。使用provider的示例代码如下:
费用条目列表组件
// 导入语句
import { DebugService } from '../debug.service';
// 组件装饰器
@Component({
    selector: 'app-expense-entry-list',
    templateUrl: './expense-entry-list.component.html',
    styleUrls: ['./expense-entry-list.component.css'],
    providers: [DebugService] })
Here, 调试服务 将仅在内部可用 费用条目列表组件 及其观点。要在其他组件中制作 DebugService,只需使用 提供者 必要组件中的装饰器。
ElementInjector 使用 viewProviders
视图提供者 类似于 provider 除非它不允许在使用创建的组件内容中使用服务 ng-内容 指示。
费用条目列表组件
// 导入语句
import { DebugService } from '../debug.service';
// 组件装饰器
@Component({
    selector: 'app-expense-entry-list',
    templateUrl: './expense-entry-list.component.html',
    styleUrls: ['./expense-entry-list.component.css'], viewProviders: [DebugService]
})
父组件可以通过其视图或内容使用子组件。下面是带有子视图和内容视图的父组件示例:
父组件视图/模板
<div>
    child template in view
    <child></child>
</div>
<ng-content></ng-content>
子组件视图/模板
<div>
    child template in view
</div>
模板中的父组件使用(另一个组件)
<parent>
    <!-- child template in content -->
    <child></child>
</parent>
Here,
- child 组件在两个地方使用。一个在父母的视野中。另一个内部父内容。
- 服务将在放置在父视图内的子组件中可用。
- 服务将在子组件中不可用,子组件放置在父组件的内容中。
解决 Angular 服务
让我们看看组件如何使用下面的流程图解析服务。
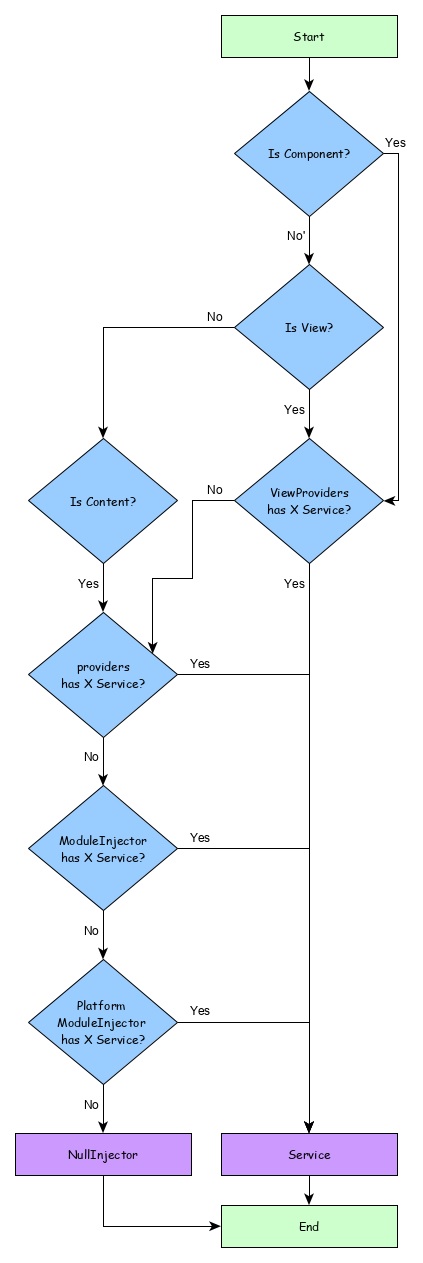
Here,
- 首先,组件尝试查找使用注册的服务 视图提供者 元数据。
- 如果未找到,组件会尝试查找使用注册的服务 提供者 元数据。
- 如果未找到,组件会尝试查找使用注册的服务 模块注射器
- 如果未找到,组件会尝试查找使用注册的服务 平台喷油器
- 如果未找到,组件会尝试查找使用注册的服务 空注入器 ,它总是抛出错误。
Injector的层次结构以及解析服务的工作流程如下:
分辨率修改器
正如我们在上一章中了解到的,服务的解析从组件开始,当找到服务时停止,或者 空注入器 到达了。这是默认分辨率,可以使用 分辨率修改器 .它们如下:
Self()
Self() 开始和停止在其当前的服务搜索 元素注入器 itself.
import { Self } from '@angular/core';
constructor(@Self() public debugService: DebugService) {}
跳过自我()
跳过自我() 与 Self() 正好相反。它跳过当前的 ElementInjector 并从其父级开始搜索服务 元素注入器 .
import { SkipSelf } from '@angular/core';
constructor(@SkipSelf() public debugService: DebugService) {}
Host()
Host() 停止在其主机中搜索服务 元素注入器 .即使服务在更高级别可用,它也会在主机处停止。
import { Host } from '@angular/core';
constructor(@Host() public debugService: DebugService) {}
可选的()
可选的() 搜索服务失败时不会抛出错误。
import { Optional } from '@angular/core';
constructor(@Optional() private debugService?: DebugService) {
    if (this.debugService) {
        this.debugService.info("Debugger initialized");
    }
}
依赖注入器提供者
依赖注入器提供者有两个目的。首先,它有助于为要注册的服务设置令牌。令牌将用于引用和调用服务。其次,它有助于从给定的配置创建服务。
如前所述,最简单的provider如下:
providers: [ DebugService ]
Here, 调试服务 既是令牌又是类,必须使用它来创建服务对象。提供者的实际形式如下:
providers: [ { provides: DebugService, useClass: DebugService }]
Here, provides 是令牌和 useClass 是创建服务对象的类引用。
Angular 提供了更多的提供者,它们如下:
别名类提供者
提供者的目的是重用现有服务。
providers: [ DebugService,
    { provides: AnotherDebugService, userClass: DebugService }]
这里只有一个实例 调试服务 将创建服务。
价值提供者
值提供者的目的是提供值本身,而不是要求 DI 创建服务对象的实例。它也可以使用现有对象。唯一的限制是对象应该是引用服务的形状。
export class MyCustomService {
    name = "My Custom Service"
}
[{ provide: MyService, useValue: { name: 'instance of MyCustomService' }]
在这里,DI 提供者只返回设置的实例 useValue 选项而不是创建一个新的服务对象。
非类依赖提供者
它使字符串、函数或对象能够在 Angular DI 中使用。
让我们看一个简单的例子。
// 创建可注入令牌
import { InjectionToken } from '@angular/core';
export const APP_CONFIG = new InjectionToken<AppConfig>('app.config');
// 创造价值
export const MY_CONFIG: AppConfig = {
    title: 'Dependency Injection'
};
// 配置提供者
providers: [{ provide: APP_CONFIG, useValue: HERO_DI_CONFIG }]
//注入服务
constructor(@Inject(APP_CONFIG) config: AppConfig) {
工厂供应商
Factory Providers 支持复杂的服务创建。它将对象的创建委托给外部函数。工厂提供者也可以选择设置工厂对象的依赖关系。
{ provide: MyService, useFactory: myServiceFactory, deps: [DebugService] };
Here, 我的服务工厂 返回的实例 我的服务 .
角服务使用
现在,我们知道如何创建和注册 Angular 服务了。让我们看看如何在组件中使用 Angular 服务。使用 Angular 服务就像将构造函数的参数类型设置为服务提供者的令牌一样简单。
export class ExpenseEntryListComponent implements OnInit {
    title = 'Expense List';
    constructor(private debugService : DebugService) {}
    ngOnInit() {
        this.debugService.info("Angular Application starts");
    }
}
Here,
-
费用条目列表组件 构造函数设置一个DebugService类型的参数。
-
Angular 依赖注入器 (DI) 将尝试查找在应用程序中注册的任何类型为 DebugService 的服务。如果找到,它会将 DebugService 的实例设置为 ExpenseEntryListComponent 组件。如果没有找到,它会抛出一个错误。
添加调试服务
让我们添加一个简单的 Debug 服务,这将帮助我们在应用程序开发过程中打印调试信息。
打开命令提示符并转到项目根文件夹。
cd /go/to/expense-manager
启动应用程序。
ng serve
运行以下命令以生成 Angular 服务, 调试服务 .
ng g service debug
这将创建两个 Typescript 文件(调试服务及其测试),如下所示:
CREATE src/app/debug.service.spec.ts (328 bytes)
CREATE src/app/debug.service.ts (134 bytes)
我们来分析一下内容 调试服务 service.
import { Injectable } from '@angular/core'; @Injectable({
    providedIn: 'root'
})
export class DebugService {
    constructor() { }
}
Here,
-
@可注入 装饰器附加到 DebugService 类,它使 DebugService 能够在应用程序的 Angular 组件中使用。
-
提供者在 选项及其值,root 使 DebugService 能够在应用程序的所有组件中使用。
让我们添加一个方法 Info,它将消息打印到浏览器控制台。
info(message : String) : void {
    console.log(message);
}
让我们在 费用条目列表组件 并用它来打印消息。
import { Component, OnInit } from '@angular/core'; import { ExpenseEntry } from '../expense-entry'; import { DebugService } from '../debug.service'; @Component({
    selector: 'app-expense-entry-list',
    templateUrl: './expense-entry-list.component.html', styleUrls: ['./expense-entry-list.component.css']
})
export class ExpenseEntryListComponent implements OnInit {
    title: string;
    expenseEntries: ExpenseEntry[];
    constructor(private debugService: DebugService) { }
    ngOnInit() {
        this.debugService.info("Expense Entry List
        component initialized");
        this.title = "Expense Entry List";
        this.expenseEntries = this.getExpenseEntries();
    }
    // 其他编码
}
Here,
-
DebugService 使用构造函数参数初始化。设置 DebugService 类型的参数 (debugService) 将触发依赖注入以创建新的 DebugService 对象并将其设置到 ExpenseEntryListComponent 组件中。
-
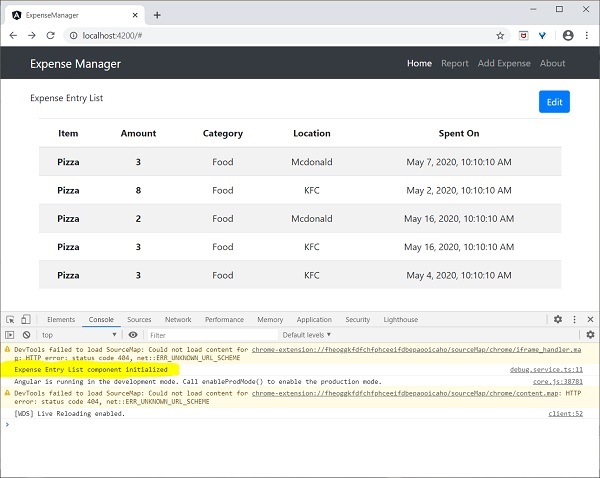
在 ngOnInit 方法中调用 DebugService 的 info 方法会在浏览器控制台中打印消息。
结果可以使用开发者工具查看,如下图所示:
让我们扩展应用程序以了解服务的范围。
让我们创建一个 调试组件 通过使用下面提到的命令。
ng generate component debug
CREATE src/app/debug/debug.component.html (20 bytes) CREATE src/app/debug/debug.component.spec.ts (621 bytes)
CREATE src/app/debug/debug.component.ts (265 bytes) CREATE src/app/debug/debug.component.css (0 bytes) UPDATE src/app/app.module.ts (392 bytes)
让我们删除根模块中的 DebugService。
// src/app/debug.service.ts
import { Injectable } from '@angular/core'; @Injectable()
export class DebugService {
    constructor() {
    }
    info(message : String) : void {
        console.log(message);
    }
}
在 ExpenseEntryListComponent 组件下注册 DebugService。
// src/app/expense-entry-list/expense-entry-list.component.ts @Component({
    selector: 'app-expense-entry-list',
    templateUrl: './expense-entry-list.component.html',
    styleUrls: ['./expense-entry-list.component.css']
    providers: [DebugService]
})
在这里,我们使用了提供者元数据 (元素注入器) 注册服务。
Open 调试组件 (src/app/debug/debug.component.ts) 并导入 调试服务 并在组件的构造函数中设置一个实例。
import { Component, OnInit } from '@angular/core'; import { DebugService } from '../debug.service';
@Component({
    selector: 'app-debug',
    templateUrl: './debug.component.html',
    styleUrls: ['./debug.component.css']
})
export class DebugComponent implements OnInit {
    constructor(private debugService: DebugService) { }
    ngOnInit() {
        this.debugService.info("Debug component gets service from Parent");
    }
}
在这里,我们还没有注册 调试服务 .因此,如果用作父组件,DebugService 将不可用。在父组件内部使用时,如果父组件有权访问该服务,则该服务可以从父组件获得。
Open 费用条目列表组件 模板 (src/app/expense-entry-list/expense-entry-list.component.html) 并包含如下所示的内容部分:
//现有内容
<app-debug></app-debug>
<ng-content></ng-content>
在这里,我们包含了内容部分和 DebugComponent 部分。
让我们将调试组件作为内容包含在 费用条目列表组件 AppComponent 模板中的组件。打开 应用组件 模板和更改 应用程序费用条目列表 如下:
// 导航代码
<app-expense-entry-list>
<app-debug></app-debug>
</app-expense-entry-list>
在这里,我们包括了 调试组件 作为内容。
让我们检查一下应用程序,它会显示 调试服务 页面末尾的模板如下图:
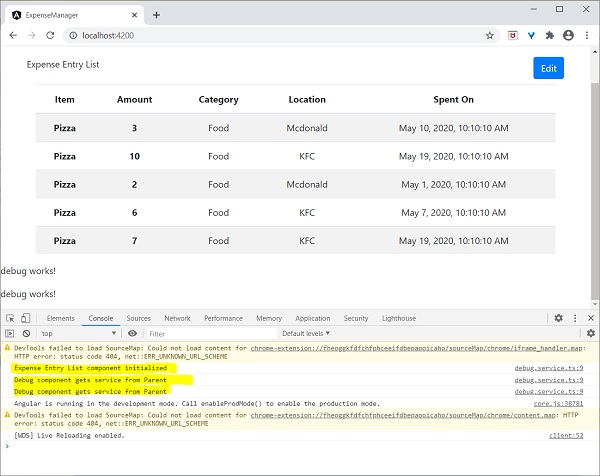
此外,我们可以在控制台的调试组件中看到两个调试信息。这表明调试组件从其父组件获取服务。
让我们改变服务注入的方式 费用条目列表组件 以及它如何影响服务的范围。将提供程序注入器更改为 viewProviders 注入。 视图提供者 不会将服务注入内容子项,因此它应该会失败。
viewProviders: [DebugService]
检查应用程序,你会看到调试组件之一(用作内容子)抛出错误,如下所示:

让我们删除模板中的调试组件并恢复应用程序。
Open 费用条目列表组件 模板(src/app/expense-entry-list/expense-entry-list.component.html)并删除下面的内容
<app-debug></app-debug>
<ng-content></ng-content>
Open 应用组件 模板和更改 应用程序费用条目列表 如下:
// 导航代码
<app-expense-entry-list>
</app-expense-entry-list>
更改 视图提供者 设置为 提供者 in 费用条目列表组件 .
providers: [DebugService]
重新运行应用程序并检查结果。