Angular 8 动画
动画为 Web 应用程序提供了令人耳目一新的外观和丰富的用户交互。在 HTML 中,动画基本上是 HTML 元素在特定时间段内从一种 CSS 样式转换为另一种样式。例如,可以通过更改其宽度和高度来放大图像元素。
如果图像的宽度和高度在一段时间内逐步从初始值变为最终值,比如 10 秒,那么我们就得到了动画效果。因此,动画的范围取决于 CSS 提供的用于设置 HTML 元素样式的特性/属性。
Angular 提供了一个单独的模块 浏览器动画模块 做动画。 浏览器动画模块 提供了一种简单明了的动画制作方法。
配置动画模块
让我们在本章学习如何配置动画模块。
按照下面提到的步骤配置动画模块, 浏览器动画模块 在一个应用程序中。
Import 浏览器动画模块 在 AppModule 中。
import { BrowserAnimationsModule } from '@angular/platform-browser/animations';
@NgModule({
    imports: [
        BrowserModule,
        BrowserAnimationsModule
    ],
    declarations: [ ],
    bootstrap: [ ]
})
export class AppModule { }
在相关组件中导入动画功能。
import { state, style, transition, animate, trigger } from '@angular/animations'
Add 动画 相关组件中的元数据属性。
@Component({
    animations: [
        // 动画功能在这里
    ]
})
export class MyAnimationComponent
Concepts
在Angular中,我们需要了解五个核心概念及其关系来做动画。
State
状态是指组件的具体状态。一个组件可以有多个定义的状态。状态是使用 state() 方法创建的。 state() 方法有两个参数。
-
name : 状态的唯一名称。
-
style : 使用 style() 方法定义的状态样式。
animations: [
    ...
    state('start', style( { width: 200px; } ))
    ...
]
Here, start 是国家的名称。
Style
Style 指在特定状态下应用的 CSS 样式。 style() 方法用于设置组件特定状态的样式。它使用 CSS 属性并且可以有多个项目。
animations: [
    ...
    state('start', style( { width: 200px; opacity: 1 } ))
    ...
]
Here, start state 定义了两个 CSS 属性, width 值为 200 像素,不透明度值为 1。
过渡
过渡 指从一种状态到另一种状态的转变。动画可以有多个过渡。每个转换都是使用 transition() 函数定义的。 transition() 有两个参数。
-
指定两个过渡状态之间的方向。例如, 开始 => 结束 指的是初始状态是 start 最终状态是 end .实际上,它是一个功能丰富的表达式。
-
使用指定动画细节 动画() 功能。
animations: [
    ...
    transition('start => end', [
        animate('1s')
    ])
    ...
]
Here, 过渡() 函数定义从开始状态到结束状态的转换,动画定义在 动画() method.
动画
动画定义了从一种状态转换到另一种状态的方式。 动画() 函数用于设置动画细节。 动画() 采用以下表达式形式的单个参数:
duration delay easing
-
duration :指过渡的持续时间。表示为1s、100ms等,
-
delay :指开始过渡的延迟时间。它表示类似于 duration
-
easing :指在给定的持续时间内如何加速/减速过渡。
Trigger
每个动画都需要一个触发器来启动动画。 trigger() 方法用于将所有动画信息,如状态、样式、过渡和动画设置在一个地方,并给它一个唯一的名称。唯一名称用于进一步触发动画。
animations: [
    trigger('enlarge', [
        state('start', style({
            height: '200px',
        })),
        state('end', style({
            height: '500px',
        })),
        transition('start => end', [
            animate('1s')
        ]),
        transition('end => start', [
            animate('0.5s')
    ]) ]),
]
Here, enlarge 是赋予特定动画的唯一名称。它有两种状态和相关样式。它有两个过渡,一个从开始到结束,另一个从结束到开始。结束到开始状态做动画的反向。
Trigger 可以附加到如下指定的元素:
<div [@triggerName]="expression">...</div>;
例如,
<img [@enlarge]="isEnlarge ? 'end' : 'start'">...</img>;
Here,
-
@enlarge :触发器设置为图像标签,并附加到一个表达式。
-
If is放大 值更改为 true,然后 end 将设置状态并触发 开始 => 结束过渡。
-
If is放大 值改为假,然后 start 将设置状态并触发 结束 => 开始过渡 .
简单动画示例
让我们编写一个新的 Angular 应用程序,通过放大具有动画效果的图像来更好地理解动画概念。
打开命令提示符并创建新的 Angular 应用程序。
cd /go/to/workspace
ng new animation-app
cd animation-app
配置 浏览器动画模块 in the 应用模块 (src/app/app.module.ts)
import { BrowserModule } from '@angular/platform-browser';
import { NgModule } from '@angular/core'
import { BrowserAnimationsModule } from '@angular/platform-browser/animations';
import { AppComponent } from './app.component'; @NgModule({
    declarations: [
        AppComponent
    ],
    imports: [
        BrowserModule,
        BrowserAnimationsModule
    ],
    providers: [],
    bootstrap: [AppComponent]
})
export class AppModule { }
Open 应用组件 (src/app/app.component.ts) 并导入必要的动画功能。
import { state, style, transition, animate, trigger } from '@angular/animations';
添加动画功能,该功能将在图像放大/缩小期间为图像设置动画。
@Component({
    selector: 'app-root',
    templateUrl: './app.component.html',
    styleUrls: ['./app.component.css'],
    animations: [
        trigger('enlarge', [
            state('start', style({
                height: '150px'
            })),
            state('end', style({
                height: '250px'
            })),
            transition('start => end', [
                animate('1s 2s')
            ]),
            transition('end => start', [
                animate('1s 2s')
            ])
        ])
    ]
})
Open 应用组件 模板, src/app/app.component.html 并删除示例代码。然后,包括一个带有应用程序标题、图像的标题和一个放大/缩小图像的按钮。
<h1>{{ title }}</h1>
<img src="assets/puppy.jpeg" style="height: 200px" /> <br />
<button>{{ this.buttonText }}</button>
编写一个函数来改变动画表达式。
export class AppComponent {
    title = 'Animation Application';
    isEnlarge: boolean = false;
    buttonText: string = "Enlarge";
    triggerAnimation() {
        this.isEnlarge = !this.isEnlarge;
        if(this.isEnlarge)
            this.buttonText = "Shrink";
        else
            this.buttonText = "Enlarge";
    }
}
在图像标签中附加动画。另外,附加按钮的单击事件。
<h1>{{ title }}</h1>
<img [@enlarge]="isEnlarge ? 'end' : 'start'" src="assets/puppy.jpeg" style="height: 200px" />
<br />
<button (click)='triggerAnimation()'>{{ this.buttonText }}</button>
完整的 应用组件 代码如下:
import { Component } from '@angular/core';
import { state, style, transition, animate, trigger } from '@angular/animations';

@Component({
    selector: 'app-root',
    templateUrl: './app.component.html',
    styleUrls: ['./app.component.css'],
    animations: [
        trigger('enlarge', [
            state('start', style({
                height: '150px'
            })),
            state('end', style({
                height: '250px'
            })),
            transition('start => end', [
                animate('1s 2s')
            ]),
            transition('end => start', [
                animate('1s 2s')
            ])
        ])
    ]
})
export class AppComponent {
    title = 'Animation Application';
    isEnlarge: boolean = false;
    buttonText: string = "Enlarge";


    triggerAnimation() {
        this.isEnlarge = !this.isEnlarge;

        if(this.isEnlarge)
            this.buttonText = "Shrink";
        else
            this.buttonText = "Enlarge";
    }
}
完整的 AppComponent 模板代码如下:
<h1>{{ title }}</h1>
<img [@enlarge]="isEnlarge ? 'end' : 'start'" src="assets/puppy.jpeg" style="height: 200px" />
<br />
<button (click)='triggerAnimation()'>{{ this.buttonText }}</button>
使用以下命令运行应用程序:
ng serve
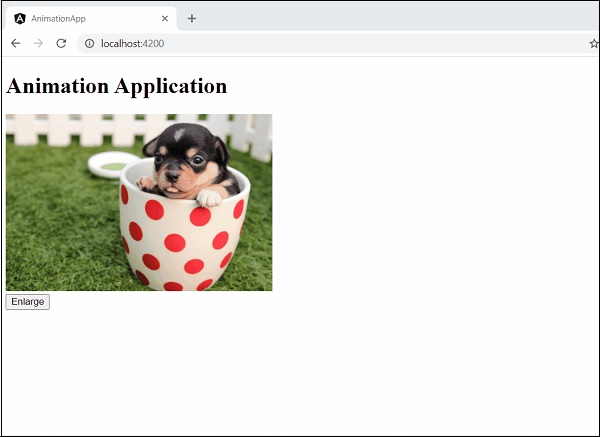
单击放大按钮,它将放大带有动画的图像。结果将如下图所示:
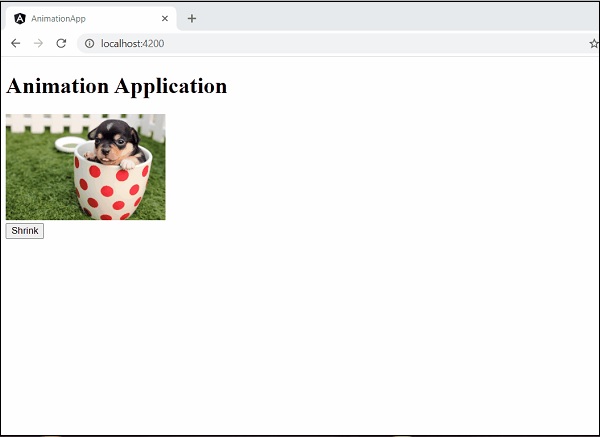
再次单击该按钮以缩小它。结果将如下图所示: