Angular7 路由
路由基本上意味着在页面之间导航。你已经看到许多带有将你引导至新页面的链接的网站。这可以使用路由来实现。在这里,我们所指的页面将采用组件的形式。我们已经看到了如何创建组件。现在让我们创建一个组件,看看如何使用路由。
在项目设置过程中,我们已经包含了路由模块,并且在 app.module.ts 中也可以使用,如下所示:
app.module.ts
import { BrowserModule } from '@angular/platform-browser';
import { NgModule } from '@angular/core';
import { AppRoutingModule } from './app-routing.module';
import { AppComponent } from './app.component';
import { NewCmpComponent } from './new-cmp/new-cmp.component';
import { ChangeTextDirective } from './change-text.directive';
import { SqrtPipe } from './app.sqrt';

@NgModule({
    declarations: [
        SqrtPipe,
        AppComponent,
        NewCmpComponent,
        ChangeTextDirective
    ],
    imports: [
        BrowserModule,
        AppRoutingModule
    ],
    providers: [],
    bootstrap: [AppComponent]
})
export class AppModule { }
应用路由模块 如上所示添加并包含在导入数组中。
文件详情 应用程序路由模块 下面给出:
import { NgModule } from '@angular/core';
import { Routes, RouterModule } from '@angular/router';

const routes: Routes = [];
@NgModule({
    imports: [
        RouterModule.forRoot(routes)
    ],
    exports: [RouterModule]
})
export class AppRoutingModule { }
在这里,我们要注意,这个文件是在项目设置过程中添加路由时默认生成的。如果不添加,则必须手动添加上述文件。
所以在上面的文件中,我们从@angular/router 导入了Routes 和RouterModule。
有一个常量 routes 定义了属于Routes类型的。它是一个数组,包含我们项目中需要的所有路由。
const 路由被提供给 RouterModule,如 @NgModule 中所示。要向用户显示路由详细信息,我们需要在希望显示视图的位置添加
在 app.component.html 中添加了相同的内容,如下所示 -
<h1>Angular 7 Routing Demo</h1>
<router-outlet></router-outlet>
现在让我们创建 2 个组件,称为 Home and 联系我们 并使用路由在它们之间导航。
组件主页
首先,我们将讨论 Home。以下是 Component Home 的语法:
ng g component home
C:\projectA7\angular7-app>ng g component home CREATE
src/app/home/home.component.html (23 bytes) CREATE
src/app/home/home.component.spec.ts (614 bytes) CREATE
src/app/home/home.component.ts (261 bytes) CREATE
src/app/home/home.component.css (0 bytes) UPDATE
src/app/app.module.ts (692 bytes)
联系我们
以下是组件联系我们的语法:
ng g component contactus
C:\projectA7\angular7-app>ng g component contactus
CREATE src/app/contactus/contactus.component.html (28 bytes)
CREATE src/app/contactus/contactus.component.spec.ts (649 bytes)
CREATE src/app/contactus/contactus.component.ts (281 bytes)
CREATE src/app/contactus/contactus.component.css (0 bytes)
UPDATE src/app/app.module.ts (786 bytes)
我们已完成创建组件主页并与我们联系。下面是app.module.ts中组件的详细信息:
import { BrowserModule } from '@angular/platform-browser';
import { NgModule } from '@angular/core';
import { AppRoutingModule } from './app-routing.module';
import { AppComponent } from './app.component';
import { NewCmpComponent } from './new-cmp/new-cmp.component';
import { ChangeTextDirective } from './change-text.directive';
import { SqrtPipe } from './app.sqrt';
import { HomeComponent } from './home/home.component';
import { ContactusComponent } from './contactus/contactus.component';

@NgModule({
    declarations: [
        SqrtPipe,
        AppComponent,
        NewCmpComponent,
        ChangeTextDirective,
        HomeComponent,
        ContactusComponent
    ],
    imports: [
        BrowserModule,
        AppRoutingModule
    ],
    providers: [],
    bootstrap: [AppComponent]
})
export class AppModule { }
现在让我们在 应用程序路由模块 .ts如下图:
import { NgModule } from '@angular/core';
import { Routes, RouterModule } from '@angular/router';
import { HomeComponent } from './home/home.component';
import { ContactusComponent } from './contactus/contactus.component';

const routes: Routes = [
    {path:"home", component:HomeComponent},
    {path:"contactus", component:ContactusComponent}
];
@NgModule({
    imports: [RouterModule.forRoot(routes)],
    exports: [RouterModule]
})
export class AppRoutingModule { }
routes 数组包含带有路径和组件的组件详细信息。如上所示导入所需的组件。
在这里,我们需要注意的是,我们路由所需的组件是在 app.module.ts 和 app-routing.module.ts 中导入的。让我们将它们导入到一个地方,即在 app-routing.module.ts 中。
因此,我们将创建一个用于路由的组件数组,并将该数组导出到 app-routing.module.ts 中,然后再次将其导入 app.module.ts 中。所以我们在 app-routing.module.ts 中拥有了所有用于路由的组件。
我们就是这样做的 应用程序路由.module.ts :
import { NgModule } from '@angular/core';
import { Routes, RouterModule } from '@angular/router';
import { HomeComponent } from './home/home.component';
import { ContactusComponent } from './contactus/contactus.component';

const routes: Routes = [
    {path:"home", component:HomeComponent},
    {path:"contactus", component:ContactusComponent}
];
@NgModule({
    imports: [RouterModule.forRoot(routes)],
    exports: [RouterModule]
})
export class AppRoutingModule { } export const
RoutingComponent = [HomeComponent,ContactusComponent];
在 app.module.ts 中导入组件数组即 RoutingComponent 如下:
import { BrowserModule } from '@angular/platform-browser';
import { NgModule } from '@angular/core';
import { AppRoutingModule , RoutingComponent} from './app-routing.module';
import { AppComponent } from './app.component';
import { NewCmpComponent } from './new-cmp/new-cmp.component';
import { ChangeTextDirective } from './change-text.directive';
import { SqrtPipe } from './app.sqrt';

@NgModule({
    declarations: [
        SqrtPipe,
        AppComponent,
        NewCmpComponent,
        ChangeTextDirective,
        RoutingComponent
    ],
    imports: [
        BrowserModule,
        AppRoutingModule
    ],
    providers: [],
    bootstrap: [AppComponent]
})
export class AppModule { }
所以现在我们完成了路线的定义。我们需要向用户显示相同的内容,所以让我们在 app.component.html 中添加两个按钮,Home 和 Contact Us,然后单击相应的按钮,它将显示我们在
在 app.component.html 中创建按钮并给出创建的路由的路径。
app.component.html
<h1>Angular 7 Routing Demo</h1>
<nav>
    <a routerLink = "/home">Home</a>
    <a routerLink = "/contactus">Contact Us </a>
</nav>
<router-outlet></router-outlet>
在 .html 中,我们添加了锚链接、Home 和 Contact us,并使用 routerLink 提供了我们在 app-routing.module.ts 中创建的路由的路径。
现在让我们在浏览器中进行同样的测试:
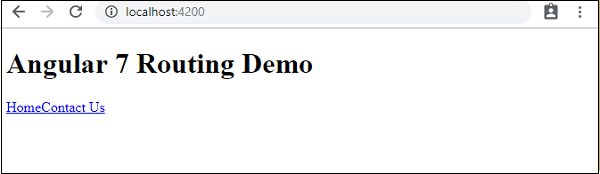
这就是我们在浏览器中获取它的方式。让我们添加一些样式以使链接看起来不错。
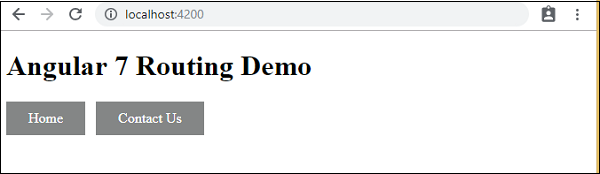
我们在 app.component.css 中添加了以下 css:
a:link, a:visited {
    background-color: #848686;
    color: white;
    padding: 10px 25px;
    text-align: center;
    text-decoration: none;
    display: inline-block;
}
a:hover, a:active {
    background-color: #BD9696;
}
这是浏览器中链接的显示:
点击 Home 链接,可以看到 home 的组件详情,如下图:

点击联系我们,查看其组件详情如下:
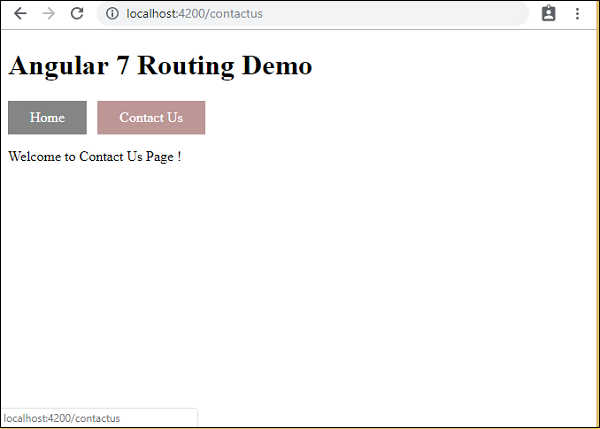
当你单击链接时,你还将看到地址栏中的页面 url 发生变化。如上图所示,它会在页面末尾附加路径详细信息。